Title – Synthesis
System – Commodore 64
Author – Don Monaghan
Publication – COMPUTE! issue 084, May 1987
Page Scans – 1 2 3 4 5 6 7
Preserved by – eboy71
Recommended Emulator – VICE
/synthesis-screen1.png)
/synthesis-screen2.png)
Loading the Game –
- Mount the disk image (Compute 084 – Synthesis.d64) in your emulator. In VICE, this is done by selecting File → Attach Disk Image
- Load the app by typing LOAD”SYNTHESIS”,8
- Once loaded, type RUN to play
Instruction Summary:
- Note: the article text is transcribed below and it contains full, detailed instructions about how to use the app, how the various features work, and a bit of theory to boot. The following is an abbreviated summary of basic features for getting started:
- When the program loads, you will find yourself in the file manager. This is where you can load and save voice files. There is a voice file included in this listing, and on the disk image. Press “L” to load the file and enter the filename “VOICES” when prompted.
- Once it’s loaded, a list of 36 different voices will appear.
- To load a voice into memory, press F1, use the cursor keys to navigate the list, and then press RETURN to select.
- Once selected, press F7 to play around and edit the voice you selected.
- On the synthesizer screen you can play songs with the selected voice by pressing the keys listed on the keyboard at the bottom of the screen.
- You can also edit any of the settings by moving to that option with the cursor keys and pressing + or – to alter the values.
Article Text & Instructions
Hang on to your hats, music enthusiasts— this program turns the Commodore 64 into an impressive music synthesizer with full control over the 64’s multifaceted sound chip. Beginners and experts alike can have fun playing music and trying out different sounds with this program. And if you’re already familiar with the 64’s sound capabilities, you’ll find “Synthesis” a powerful tool for experimenting with electronic music sounds. The program works with either disk or tape and requires no extra equipment.
=====
When you got your Commodore 64 or 128, you may have heard that its SID (Sound Interface Device) chip is one of the best sound and music devices in any personal computer. That’s true, but programming the SID chip can be a complex business, requiring several POKEs to produce just one sound. “Synthesis” unlocks the full potential of the 64’s sound-maker, providing you the equivalent of a sophisticated electronic music synthesizer.
Synthesis turns the 64’s keyboard into a musical keyboard, so you can play the synthesizer simply by pressing on the computer’s keys. The program also provides a convenient, full-featured editor for designing your own sounds and for experimenting. Once you find a sound that you like, it can be saved to disk or tape for future use or revision. In this way you can build a complete library of instrument voices and sound effects.
Even if you don’t know anything about programming the SID chip, you can have fun with this program immediately. This article includes 36 preset patches (sound settings), ranging from conventional musical instruments like the flute and cello to far-out electronic sounds such as space bass, percolator, and metallica.
A Synthesizer And 36 Voices
This article includes two programs. Program 1 is the synthesizer and sound editor. Program 2 is not actually a program, but a data file of 36 different synthesizer voices. While it’s not absolutely necessary to type in Program 2, you’ll probably want to have it as a demonstration of the wide capabilities of Synthesis and the SID chip.
Both programs must be entered with the “MLX” machine language entry program found elsewhere in this issue. Follow the MLX instructions carefully. If you are using a cassette drive, you’ll want to save Program 2 immediately after Program 1 on the same tape. Here are the addresses you need to type the programs in with MLX;
Program 1. SYNTHESIS
Starting address; 0801
Ending address; 1C37
Program 2. VOICES
Starting address: 1C38
Ending address; 23E2
Although it’s written in machine language, Synthesis loads and runs the same way a BASIC program does. Load it from disk or tape, type RUN, and press RETURN. Do not try to start it with a SYS command.
Quick Demo
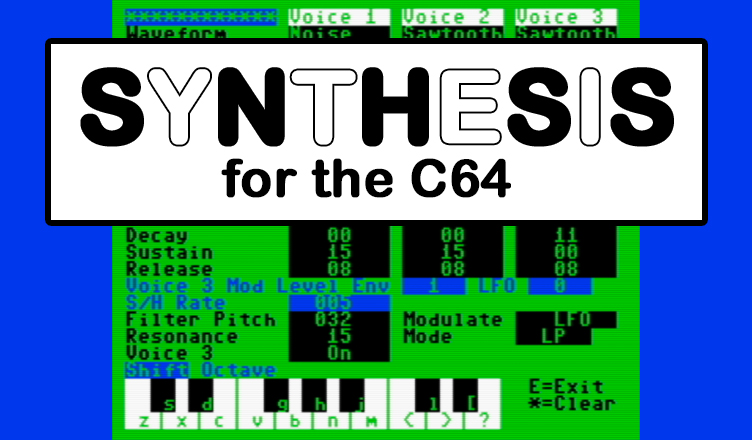
We’ll describe all of the synthesizer’s functions fully, but for those who can’t wait to try it out, here’s a quick demonstration. After typing and saving Programs 1 and 2, load and run Program 1. Synthesis puts you in the file editor screen. The top portion of the screen contains prompts that show you which keys to press for various options. The remainder of the screen is taken up with blank slots which will be filled in after you load a voice file. (Program 2 is a sample voice file.)
Let’s begin by playing the synthesizer. From the main screen, press the F7 function key: Synthesis displays the synthesizer screen. At the bottom of the screen is a musical keyboard display that indicates which of the computer’s keys act as synthesizer keys. Play the synthesizer using these keys. (If you don’t hear any sound, turn up the volume on your TV or monitor.) This is the default voice — the one that Synthesis uses if you haven’t loaded or created a custom voice.
When you’ve finished playing, press E to exit the synthesizer and return to the file editor. Now let’s load a voice file. Press L; then type in the filename when prompted. If you saved Program 2 with the name VOICES, type VOICES and press RETURN, Synthesis then asks whether you wish to load from disk (press D) or tape (press T). After the file has loaded. Synthesis prompts you to press the asterisk (*) key to return to the file editor.
When you return to the main screen, notice that it is now filled with the names of 36 different synthesizer voices. All of these voices have been loaded in memory and are available for your use. To select a voice, press the F1 key. Synthesis displays a cursor (>) in front of the first voice name. Use the cursor keys to move around the screen until you find a voice that sounds interesting. To choose that voice, press RETURN.
The voice which you selected has now been loaded into the synthesizer. To hear what it sounds like, press F7 to go to the synthesizer; then press any of the synthesizer keys. The synthesizer uses the selected voice in place of the default voice which you heard earlier. When you’ve heard enough, press E to return to the file editor; then press F1 to select one of the other 35 voices. There’s a wide variety to choose from.
File Editor
The program begins by displaying the file editor screen. Here is where you select existing voices, name new voices that you have created, and save or load completed files. A voice file can contain as many as 36 individual voices.
The file editor screen offers six options, which you select by pressing the keys indicated on the screen. A list of editor options follows.
F1. The F1 function key loads a voice from the file into the synthesizer. Use the cursor keys to move the pointer to the desired voice, and press RETURN. Synthesis loads that voice into the synthesizer; when you go to the synthesizer screen, that voice is available for your use.
F3. This key takes the voice currently in the synthesizer and stores it in the voice file. If you have just created a new voice and wish to save it, you must store the voice with this function before saving the file (the save function is explained below).
F5. The F5 key allows you to change the name of the current voice. Enter a name when prompted and press RETURN. The voice name must be no more than 12 characters in length. To rename an existing voice, first select it with F1; then press F5 to rename it.
F7. Press F7 to exit the file editor and go to the synthesizer screen.
L. Loads a voice file from tape or disk. The program prompts you to enter a filename and then asks whether to load from disk or tape. Press C at the second prompt to cancel the operation.
S. Saves the voice file to tape or disk. This saves all of the voices which appear in the voice list on the file editor screen (voices which have been loaded with L or stored by pressing F3). The current voice in the synthesizer will not be saved unless you have previously stored it in the file.
Synthesizer Functions
The synthesizer screen serves two different purposes: playing music and creating new voices.
By pressing the keys indicated in the musical keyboard display, you can play notes using the current voice parameters. The musical keyboard configuration appears at the bottom of the screen. Press the E key to return to the file editor screen.
The synthesizer screen also allows you to change the current voice characteristics to create a new voice or modify the current one. The voice characteristics appear in the upper portion of the screen.
Playing the synthesizer requires no further explanation. To change a voice characteristic, use the cursor keys to move the pointer to the parameter you wish to change; then press the plus key ( + ) or minus key ( – ) to increase or decrease the current value.
When you’re using this feature of Synthesis, it will help to have a basic understanding of how the SID chip works— a subject which is beyond the scope of this article. The user’s manual for your computer explains more about the SID chip, and many other references are available. If you don’t have a complete reference, don’t be afraid to experiment: You can’t hurt the computer in any way by trying out different settings (although certain combinations may result in no sound or very peculiar sounds). If you produce an unwanted sound, or simply want to discard the current voice, press the asterisk key (*); Synthesis resets all three voices to the default parameters.
Certain features of this synthesizer, such as sample and hold, are not features of the SID chip itself, but will be familiar to those who have a general knowledge of electronic music synthesis. Following is an explanation of what each voice parameter controls.
Voice Parameters
Waveform. This parameter controls the basic tonal characteristics of each of the synthesizer’s three voices. You may choose any of the basic waveforms supplied by the SID chip: triangle, sawtooth, pulse, and noise (random). Note that each of the three voices can have a different waveform.
Pulse width. This parameter controls the symmetry of the pulse waveform. Note that pulse width is relevant only if you have selected a pulse waveform; if you are using some other waveform, changing the pulse width has no effect. The range for this parameter is from 0-8, with 0 creating a very narrow pulse and 8 creating a square wave.
Pulse mod. The pulse mod parameter allows you to use voice 3 to modulate the pulse width (note that pulse width is meaningful only when a pulse waveform is in use). A constantly changing pulse width can create very interesting sounds. You may choose as the source of modulation either the envelope of voice 3 (ENV) or the output of voice 3 (LFO). LFO stands for low frequency oscillator, a source which changes with a comparatively low frequency (over a comparatively long period of time). If you choose ENV as the source of modulation, the modulation is controlled by voice 3’s current ADSR parameters (see below).
Ring. This parameter enables or disables ring modulation, a special SID chip effect which combines the frequencies of two voices in a way which produces mathematically incongruous harmonics. If that description sounds baffling, select the steel drum voice from the VOICES file and play some notes on the synthesizer. The ringing, metallic tones result from ring modulation. Ring modulation always involves two voices. If you select ring mod for voice 1, then its output is ring modulated with the output of voice 3. Voice 2 is ring modulated by voice 1, and voice 3 is ring modulated by voice 2,
Sync. This parameter enables or disables synchronization, another special effect involving two voices. Synchronization combines the frequency output of two voices to create a more complex sound than would be created with either voice alone. To hear examples of synchronization, select space bass or sync sweep from the VOICES file. The modulation order for synchronization is the same as for ring modulation. Voice 1 is synchronized with voice 3, voice 2 is synchronized with voice 1, and voice 3 is synchronized with voice 2.
Filtered. This parameter determines whether a voice is routed through the SID chip’s built-in filter. The filter allows you to suppress the output of the selected voice within a defined frequency range.
Octave. The SID chip has a frequency range of seven full octaves. This function lets you set any voice to a desired octave. If you set voice 3’s octave to 0, that voice goes into LFO (low-frequency oscillator) mode. LFO mode is used in cases where you want to use voice 3’s output to modulate some characteristic of a second voice. When you set a voice to LFO mode, that voice produces no audible output itself; instead, its output is rerouted for another purpose.
Interval. The interval parameter causes a voice’s frequency to play at a certain number of half-steps above the note being played on the musical keyboard. For instance, if you set voice 1s interval to 7 and play an F# note on the musical keyboard, Synthesis plays a C# note. If you set the voice 1 interval to 0, the voice 2 interval to 4, and the voice 3 interval to 7, you will hear a complete major chord. The major triad voice in the VOICES file demonstrates one use of the interval parameter.
Pitch. The pitch parameter allows you to detune the selected voice by raising or lowering its pitch slightly, within the range +2 to -2. The idea behind detuning is to make two (or more) voices play the same note, but set one voice just slightly off key by raising or lowering its pitch. The results sound more interesting and ”natural” than if both voices were playing in perfect unison. Listen to the honky tonk voice in the VOICES file for a demonstration of detuning.
Pitch mod. Pitch modulation is useful for creating vibrato or other pitch-based effects. Again, this parameter always involves two voices. Voice 3 provides a modulating signal which you can use to affect the output of either voice 1 or voice 2. Voice 3 may be in LFO, ENV, or S/H (sample and hold) mode. Sample and hold effects are explained below.
Track. This parameter determines whether or not the designated voice follows the synthesizer keyboard. If tracking is on for a given voice, its frequency is determined by which musical key you press. If tracking is off, the keyboard has no effect on its pitch: Instead, that voice’s pitch is controlled solely by its octave, interval, and pitch parameters. Untracking a voice allows you to use its output as an LFO or to create a drone voice which plays at a constant frequency. The bagpipe voice in the VOICES file untracks one voice for use as a drone.
Attack. The next four parameters (attack, decay, sustain, and release) are usually abbreviated with the acronym ADSR, Together, they define the envelope, or characteristic shape of the final output for a given voice. The attack parameter controls the rate at which, after a musical key is pressed, the level of the designated voice rises to its maximum volume.
Decay. After the attack has reached its peak (see above), the decay parameter controls the rate at which the output of the designated voice drops to the sustain level.
Sustain. This parameter controls the volume level at which the output of the designated voice remains until you release a key on the musical keyboard.
Release. After you’ve released a key, this parameter controls the rate at which the output of the designated voice fades away into silence.
Mod level. Some of the special effects available in Synthesis involve two voices: One voice is used to modulate (change) the output of a second voice. For pitch mod, pulse mod, sample and hold (S/H), and filter mod, the source of the modulating signal is either the ADSR envelope of voice 3 or the waveform output of voice 3. The mod level parameter controls the intensity of modulation in such cases. If you are using voice 3 to create vibrato, for instance, the mod level can change the vibrato effect from a slight wavering in pitch to a large, multioctave sweep. The maximum mod level is 9; at this extreme level, you may exceed the range for other parameters, creating a glitch in the sound.
S/H rate. The acronym S/H stands for sample and hold, another special electronic sound effect. This feature samples (looks at) the output of voice 3, holds the sampled level, then applies it to the pitch of any voice for which S/H modulation is selected. The modulated voice is then played automatically, just as if you had pressed the key again. Instead of a constantly changing pitch, as with LFO modulation, S/H modulation occurs in discrete steps. If you set the LFO mod level to 0, the pitch of the modulated voice is not changed, but the voice is still automatically rekeyed. For examples of S/H modulation, listen to the staircase, random, and mandolin voices in the VOICES file.
Filter pitch. This parameter sets the resonant frequency of the filter.
Resonance. The resonance parameter controls the strength, or amount of emphasis, which the filter has.
Mode: This characteristic selects the type of filter to be used. A bandpass filter (BP) causes the filter to pass through, or admit, only frequencies above the designated filter pitch; frequencies above the cutoff point are suppressed. A high-pass filter (HP) passes frequencies above the cutoff point and suppresses lower frequencies. Careful filtering can be very useful in simulating the sounds of natural instruments. However, since the filter is subtractive — that is, it takes away part of the sound you would otherwise hear — it tends to make the final output somewhat quieter than normal.
Voice 3. The voice 3 parameter enables or disables the final output of voice 3. If you are using voice 3 to modulate another voice, you will normally want to disable its output with this feature. If you don’t, you may hear unwanted clicks during each envelope cycle for voice 3. If you wish to disable the output of voice 1 or voice 2, set all of the ADSR parameters for that voice to zero.
Editor’s Notes:
- What a fantastic program! This is perhaps the best example I’ve ever seen of a Commodore 64 synthesizer, and definitely a rare gem for a type-in program.
- If you are typing this program in, you will need to use COMPUTE!’s MLX II to enter the machine code.


/compute-084-may87-p62.png)
/compute-084-may87-p63.png)
/compute-084-may87-p64.png)
/compute-084-may87-p65.png)
/compute-084-may87-p66.png)
/compute-084-may87-p67.png)
/compute-084-may87-p68.png)