
Title – MusicMaster
System – Commodore 64
Author – Chris Metcalf & Marc Sugiyama
Publication – COMPUTE! Issue 037, June 1983
Page Scans – 1 2 3 4 5 6
Preserved by – eboy71
Recommended Emulator – VICE
Loading the Game –
- Mount the disk image (Compute Issue 037.d64) in your emulator. In VICE, this is done by selecting File → Attach Disk Image
- Load the app by typing LOAD”MUSICMASTER”,8,1
- Once loaded, type RUN to start
Game Instructions –
- Note: the article text is transcribed below and it contains full, detailed instructions about how to use the app, how the various features work, and a bit of theory to boot. The following is an abbreviated summary of key commands.
- MusicMaster simulates a synthesizer, providing access to the complete range of the C64’s impressive sound capabilities.
- When the app is started, a 2-level (high and low) keyboard is displayed on the screen. Each key has a letter/number/symbol associated with it. Pressing those keys will play the corresponding sound. Note that the bottom keyboard is a continuation of the upper.
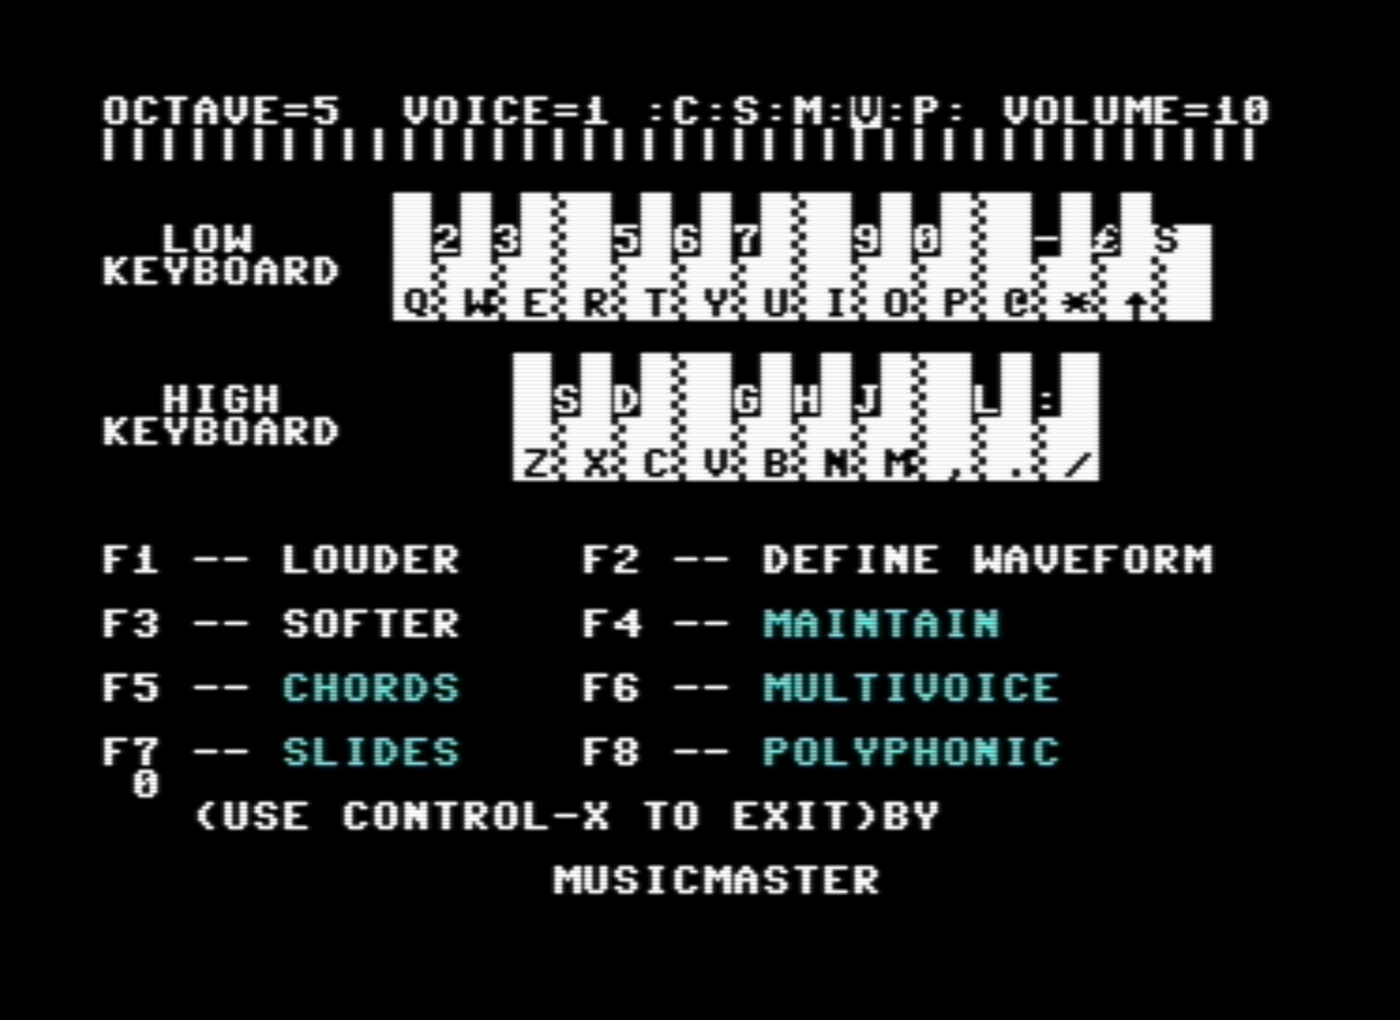
- Along the top of the app are a series of parameter indicators:
- OCTAVE: can be adjusted by holding CONTROL and a number from 1-8
- VOICE: can be adjusted by holding the COMMODORE key and a number from 1-8
- VOLUME: can be adjusted with F1 (increase) and F3 (decrease)
- The letters C (chords),S (slides),M (maintain),V (multivoice), and P (polyphonic) correspond to the functions displayed on the main screen. Pressing the corresponding function key (e.g., F4 for Maintain) will toggle that feature. When a feature is toggled on, the letter is shown in reversed font.
- Selecting Chord-mode (F5) shows a secondary menu with the chord type. Chord type can be changed with SHIFT 1-8. Inversions can be toggled with SHIFT + (root), – (first) and £ (second).
- F2 allows you to define a waveform for one of the 8 voices. A sub-menu gives you the ability to define the voice # (1-8), attack rate, decay rate, sustain level, release rate, and the waveform type (saw, triangle, pulse, noise.) After editing a waveform, you will be returned to the play mode, with the voice you just edited automatically selected.
- Pressing spacebar stops whatever sound is currently being played.
- Press CTRL-X to exit the app.
Article Text
This excellent program simulates a realtime, full-function, synthesizer control panel for Commodore 64 sound and music. Your keyboard becomes the connection between you and the sounds you hear. The screen displays a double piano keyboard and the status of the other elements of the sounds you are creating.
MusicMaster’s functions include: slide, one-key access to all the primary chords, timbre, envelope, duration, octave, maintain, polyphony, waveform, and others. All available immediately and automatically from the keyboard.
The power and versatility of the 64’s “music synthesizer on a chip” offer the programmer-musician extraordinary control over sound: its shape, color, even interactions between sounds (modulation). There is much freedom, but this also means that there are many aspects of each sound for the programmer to control: for example, you can play chords as easily as single notes. Above all, you’ll learn the meaning of the various sound registers – because you’ll hear the effect as you change the registers. Now you can begin to fully explore the amazing sounds of the 64.
Enter the MusicMaster program into your Commodore 64 as you would enter any other BASIC program. MusicMaster includes two short machine language subroutines in DATA statements, so be certain that all those numbers are entered correctly. After you have entered and saved the program, run it. Be sure that the volume of your television or audio output device is turned up enough so that you can hear the computer.
Shortly before the message “PLEASE STAND BY” has left the screen, the computer will display the instructions. Across the top of the screen, you will find a row of indicators. The first item on this row is the OCTAVE, which has a range from one to eight. This is followed by the VOICE number, which indicates the particular timbre of your output. After this is a series of letters which indicate the current mode of operation. These modes will be described below. The last indicator is the VOLUME, with a range of 0 to 15.
The Double Keyboard
Under the indicator line are the two musical keyboards. They indicate where on the computer’s keyboard the musical keyboards can be found (sic). The lower keyboard is a continuation of the upper keyboard; thus the lower set of keys plays the higher notes.
Below the keyboards is a description of the functions assigned to the programmable function keys. The left column describes the unshifted function keys, and the right column describes the shifted function keys.
F1 and F3: These keys allow you to change the volume of the music. Pressing F1 will increase the volume one step, and pressing F3 will decrease the volume one step. Notice how the VOLUME indicator changes as you press either one of these keys. Remember that the volume ranges from 0 to 15; 0 is completely silent, and 15 is the maximum volume.
F4: Pressing F4 will change the status of the Maintain mode, indicated by the “M” in the indicator row. When the mode is in operation, the “M” will be in reverse field. When this mode is activated, the computer does not release the tones after the keys have been pressed. Instead, the tones continue until other keys are pressed. To silence all the voices, press the space bar.
F6: This key changes the status of the Multivoice mode. This mode is indicated by the “V” in the indicator row. A reverse field “V” indicates that the mode is in operation. The Multivoice mode enables more than one voice to be played at the same time. The program “powers on” with the mode activated. If the mode is not activated, then one tone follows the next on the same voice, and chords cannot be played. This has some disadvantages, but it is useful in conjunction with the Slide mode. With this mode, you can have up to three simultaneous voices.
F7 and F5: Pressing these keys changes the status of the Slide and Chord modes. They will be described below.
F2: This key allows you to define your own waveforms.
Making Music
Once the program is ready, press the following key sequence: QWERTYUI. You should hear a C major scale. If you do not, check the program for typing errors. Now try this key sequence: IOP@*(up arrow)(RUN/STOP)Z. This time you should hear the same scale, but one octave higher.
Pressing the sequence ZXCVBNM produces another scale one octave higher than the last. Now try pressing the keys QET all at once to get a C-major chord. Each note of this chord is assigned one voice. Since there are only 3 voices, the computer can accept only three keys at one time as input.
If you want to change octaves, press the control key and a number from one to eight, one being the lowest octave and eight being the highest. Some of the voices do not work well in very low octaves. Pressing the Commodore key and a number will change the VOICE number. This, too, has a range of one to eight.
The Slide mode is very interesting. A reverse-field “S” on the status row indicates that the Slide mode is active. The Slide mode will work regardless of the Multivoice and Maintain modes. When in this mode, the computer steps smoothly through the tones rather than moving by half tones as a piano would. This can produce an intriguing, eerie effect with the Maintain mode activated. For example, enter the Slide mode, make sure that the Maintain and Multivoice modes are activated, and press the following key sequence: QETIP*ZCB, . As always, you can silence the voices by pressing the space bar.
Forming Chords
Another mode of operation is the Chord mode. This allows for single key control over different types of chords and their inversions. Once you activate the Chord mode, a second indicator row appears. On the left is the chord name, and on the right is the chord position – root, first inversion, or second inversion.
The root chord is a chord in which the lowest note is also the key of the chord. For example, the C major triad is formed using the notes C,E, and G. When the notes are in that order, CEG, the chord is a root chord. If the notes of the chord start on a different note than C, then we have the inversions of the chord. For example, E and G, with high C, is the first inversion, and G, with high C and E, is the second inversion.
To change the chord type, press the shift-key and a number from one to nine. The chords which are available correspond to the following numbers: (1) Major; (2) Minor; (3) Diminished; (4) Augmented; (5) Major Seventh; (6) Minor Seventh; (7) Dominant Seventh; (8) Major Sixth; (9) Minor Sixth.
The inversions are selected by pressing the shift key and the plus sign for root, the minus sign for the first inversion, and the pound sign for the second inversion.
In order to play a chord, you must first select the chord type and inversion that you want, and then press the note on the keyboard which corresponds to the lowest note of your chord. For example, if you want to play a D flat minor second inversion chord, enter the Chord mode, select the minor chord and the second inversion (by pressing shift-2 and shift-pound-sign) and press “R”, which corresponds to the note F on the musical keyboard. The chord that you will hear is comprised of the following notes: F, B flat, and high D flat. (Since the Slide mode can slide only one voice at a time, the Chord and Slide modes are incompatible, so turning on one automatically turns off the other.)
Attack, Decay, Sustain, Release
To define your own waveform, press F2. Once you are in this mode, the computer asks a series of questions that apply to the construction of a new waveform. The first question is which waveform you wish to change. Pressing RETURN with no other input returns program control to the play mode. After this question, the computer displays the current Attack, Decay, Sustain, and Release values, and asks for new values. Pressing RETURN with no other input or giving a bad input returns you to the first question.
The Envelope
The attack rate is the time that it takes the sound to reach the highest volume level. The larger the number, the more time it takes. Decay is the time it takes the sound to drop to the Sustain volume level. Sustain is the volume level at which the sound remains until the Release is initiated. The Release rate is the time that it takes the sound to soften from the sustain level to silence (see the figure.)
After these questions, the computer asks for the waveform type. You must enter the first letter of the type of waveform desired. If the Pulse waveform is selected, then the pulse rate must be entered. The authors of the Commodore 64 manual have written the pulse value as two numbers, the LOW pulse and the HIGH pulse. To obtain a single value for the pulse rate, take the HIGH pulse times 256 and add it to the LOW pulse. Once these questions have been answered, the computer returns to the playing mode with the voice set to the one you have just modified.
Program Structure
The mechanics are fairly simple since most of the program is written in BASIC. The REMs identify the major sections of the program (see the table for a description of variables.) However, some programming tricks are used. The POKE214,X command moves the cursor to line x on the screen. But a PRINT with no statement must follow this POKE or the cursor will not move to its new location. A POKE 788,53 disables the RUN/STOP key.
Editor’s Notes:
- This is a fantastic app, and one of the first that I’ve seen published that take provide users with full access to the C64’s SID chip, which was revolutionary when released.
- Chris Metcalf and Marc Sugiyama developed multiple games for the C64, most of which were published in Compute! or Compute! Gazette.


/1983-06%20Musicmaster%20-%20Compute%20037%20-%20p122.png)
/1983-06%20Musicmaster%20-%20Compute%20037%20-%20p126.png)
/1983-06%20Musicmaster%20-%20Compute%20037%20-%20p128.png)
/1983-06%20Musicmaster%20-%20Compute%20037%20-%20p130.png)
/1983-06%20Musicmaster%20-%20Compute%20037%20-%20p132.png)
/1983-06%20Musicmaster%20-%20Compute%20037%20-%20p133.png)
The disc seems not to run. Musicmaster has 0 Blocks and can not be loaded. Please provide a better version if possible.
Thank you for letting us know, it is now fixed.